Contact Us
We're here to help.
All The Answers, A Few Clicks Away
Find the information you need instantly. Take a look at our Knowledge Centre for instructional guides and detailed information regarding every aspect of our service.
Knowledge Centre Find Credit Card Transaction Find My TicketsCustomer Support
Can you find your answer instantly in our FAQs? If not, get in touch. We'd love to help.
FAQs
Can you find your answer instantly in our FAQs? If not, visit Customer Support. We'd love to help.
-
What benefits do I get as an organiser?
You enjoy a range of benefits as an event organiser with Sticky Tickets, the biggest being the saving of time and the ease of listing, managing, selling tickets to and promoting your event, all in one place.
- We have been in business since 2007 and are Australian owned and operated
- We are trusted by thousands of event organisers
- Well over 5 million tickets sold
- Our website is secure and PCI compliant (PCI is a global standard which insures the protection of critical data over the web)
- Simple to use website- you can set up an event within minutes
- Simple fee structure, no hidden costs, you only pay for what you use
- Great customer service through multiple channels- phone, email and live chat for extended hours
- Regular new feature releases
- The only charge is for purchases with a credit card. Where there is no cost (ie free registration) there is no fee.
Some of our standard features are...- An event web page which is easy to set-up and include logos, images and ticketing information.
- A personalised organiser page with an overview of your business, committee or cause and a listing of all your current Sticky Tickets events.
- A tool to help you customise the look and feel of your pages and to match your website if you have one.
- The ability to list as many events as you like at any one time.
- Create different ticket types such as early bird pricing, member/non-member pricing, group packages, donations, table bookings and more.
- Create subticket ticket types, a great way to offer a product or up sell another event on the proviso that a main ticket is bought with it.
- All credit card processing is handled by Sticky Tickets, so there's no need to worry about merchant facilities or security.
- Assign Sticky Tickets to automatically email the e-ticket and tax receipt for you when a customer makes a purchase.
- Log in to your private event account to view how many tickets have been sold, reports and to export a list of attendees.
- Add people manually to the attendance list if they pay you offline (via cash/cheque/direct deposit) or if you would like to give away some discounted or complimentary tickets.
- Free ticket scanning app available for Android and IOS devices
- Ability to create a seating plan so ticket purchasers can select their own seat or table
- Send out SMS/ Email reminders to stay in touch with attendees
- MailChimp integration
- Webhooks
- Facebook Pixel Integration
- Facebook Event Integration
- There are many more features- if you have any questions or to see how we can help with your event, please don't hesitate to contact us any time and we'd be more than happy to help.
-
How can I process arrivals at my event?
You have a number of options for checking-off tickets at your event:
- By name
- By ticket number
- By barcode
We also have a free Check-in app available from the iTunes Store and Google Play Store. This will enable you to scan e-tickets on a mobile device and check your attendees in and out of your event. For more information about our scanning app, please click here.
You can also download the Attendees List report before the event starts, to manually check off the guests as they arrive. To find out how you can get a copy of your event's Attendee's List, please click here.
If you have any questions about this or anything else, please don't hesitate to contact us and we'd be more than happy to help.
Related Articles:
Using the Check-in App to scan tickets
Where to Download the Attendees List
-
How do I create my first event on Sticky Tickets?
Our step-by-step wizard makes setting up your first event a breeze. Take a look at our Starter's Guide
-
When do I receive the revenue from my ticket sales?
All revenue from your ticket sales is deposited directly into your nominated bank account (minus booking fees) at the conclusion of your event.*
We do however understand that funds are sometimes needed before an event is held to pay suppliers, therefore you can apply for the Payment Request Feature and request a portion of your ticket sales in advance. There is an application fee of $49 incl. GST payable per organiser. If approved, all of your events will have this feature.
Please note: You will be requested to sign a personal guarantee and to provide 100 points of identification.
* This is industry standard, with very few ticketing providers releasing sales before an event as there are restrictions placed upon us in order to protect ticket purchasers from purchasing tickets to an event that is not held.
Related Articles:
-
I need to be paid before my event finishes
All revenue from your ticket sales is deposited directly into your nominated bank account (minus booking fees) at the conclusion of your event. This is industry standard, with very few ticketing providers releasing sales before an event, as there are restrictions placed upon us in order to protect ticket purchasers from purchasing tickets to an event that is never held. We do understand however that sometimes suppliers/venues etc need to be paid before an event, therefore we have the Payment Request Feature, which provides you with the ability to access 50% of ticket sales.
If you require funds to be transferred prior to the event, you can apply for the Payment Request Feature and receive up to 50% of your ticket sales in advance. There is an application fee of $49 incl. GST payable per organiser. If approved, all of your events will have this feature.
How to apply:
- Fill out the application form (see attached file below) and
- Also send a scanned copy of your driver’s license (front and back) and 2 utility bills with the same address as your license.
- Pay a $49 processing fee (only billed if your application is approved)
If approved, a "Payment Request" tab will appear on your event summary page. For details on how to request funds once you've been approved, please see the request a payment page.
If you have any questions regarding payment or anything else, please contact us at support any time and we'd be more than happy to help.
- Fill out the application form (see attached file below) and
-
How many events can I run at the same time?
You can run as many events as you like at any one time.
If you do have multiple events running at the same time, you might like to create your own Organiser Page, which lists all current events and is updated automatically. The URL always remains the same so you can send ticket purchasers here to see all events. Please contact us if you have any questions and we'd be happy to help.
Related Articles:
Organiser Page - Designing Your Own Organiser Page
How to create sessions for a live or completed event
-
How many different ticket types can I create?
Sticky Tickets allows for as many different ticket types and prices as you like, and can be set up in many ways. Some examples are: single tickets, group tickets, reserved seats/tables, discounted tickets and also a bulk ticket purchase discount. You can also control the start and end times of ticket sales, which allows you to create an early bird ticket if needed. To find out more about this, please click here.
Please don't hesitate to contact us if you'd like any further information.
Related Articles:
I want to create different ticket types
-
How do my attendees receive their tickets and receipts?
You can assign Sticky Tickets to email e-tickets and tax receipts for you when a customer purchases online. If you’re not providing tickets or you want to send them via an alternate method, you can just deactivate the email ticket option when you set up your event.
Please note: As the organiser you will receive email copies of all tickets sold and receipts.
If you have any further questions, please don't hesitate to contact us at support and we'd be happy to help.
Related Articles:
Automating the eTicket and Tax Receipt Delivery
How do I resend a ticket order?
-
What does an e-ticket and receipt look like?
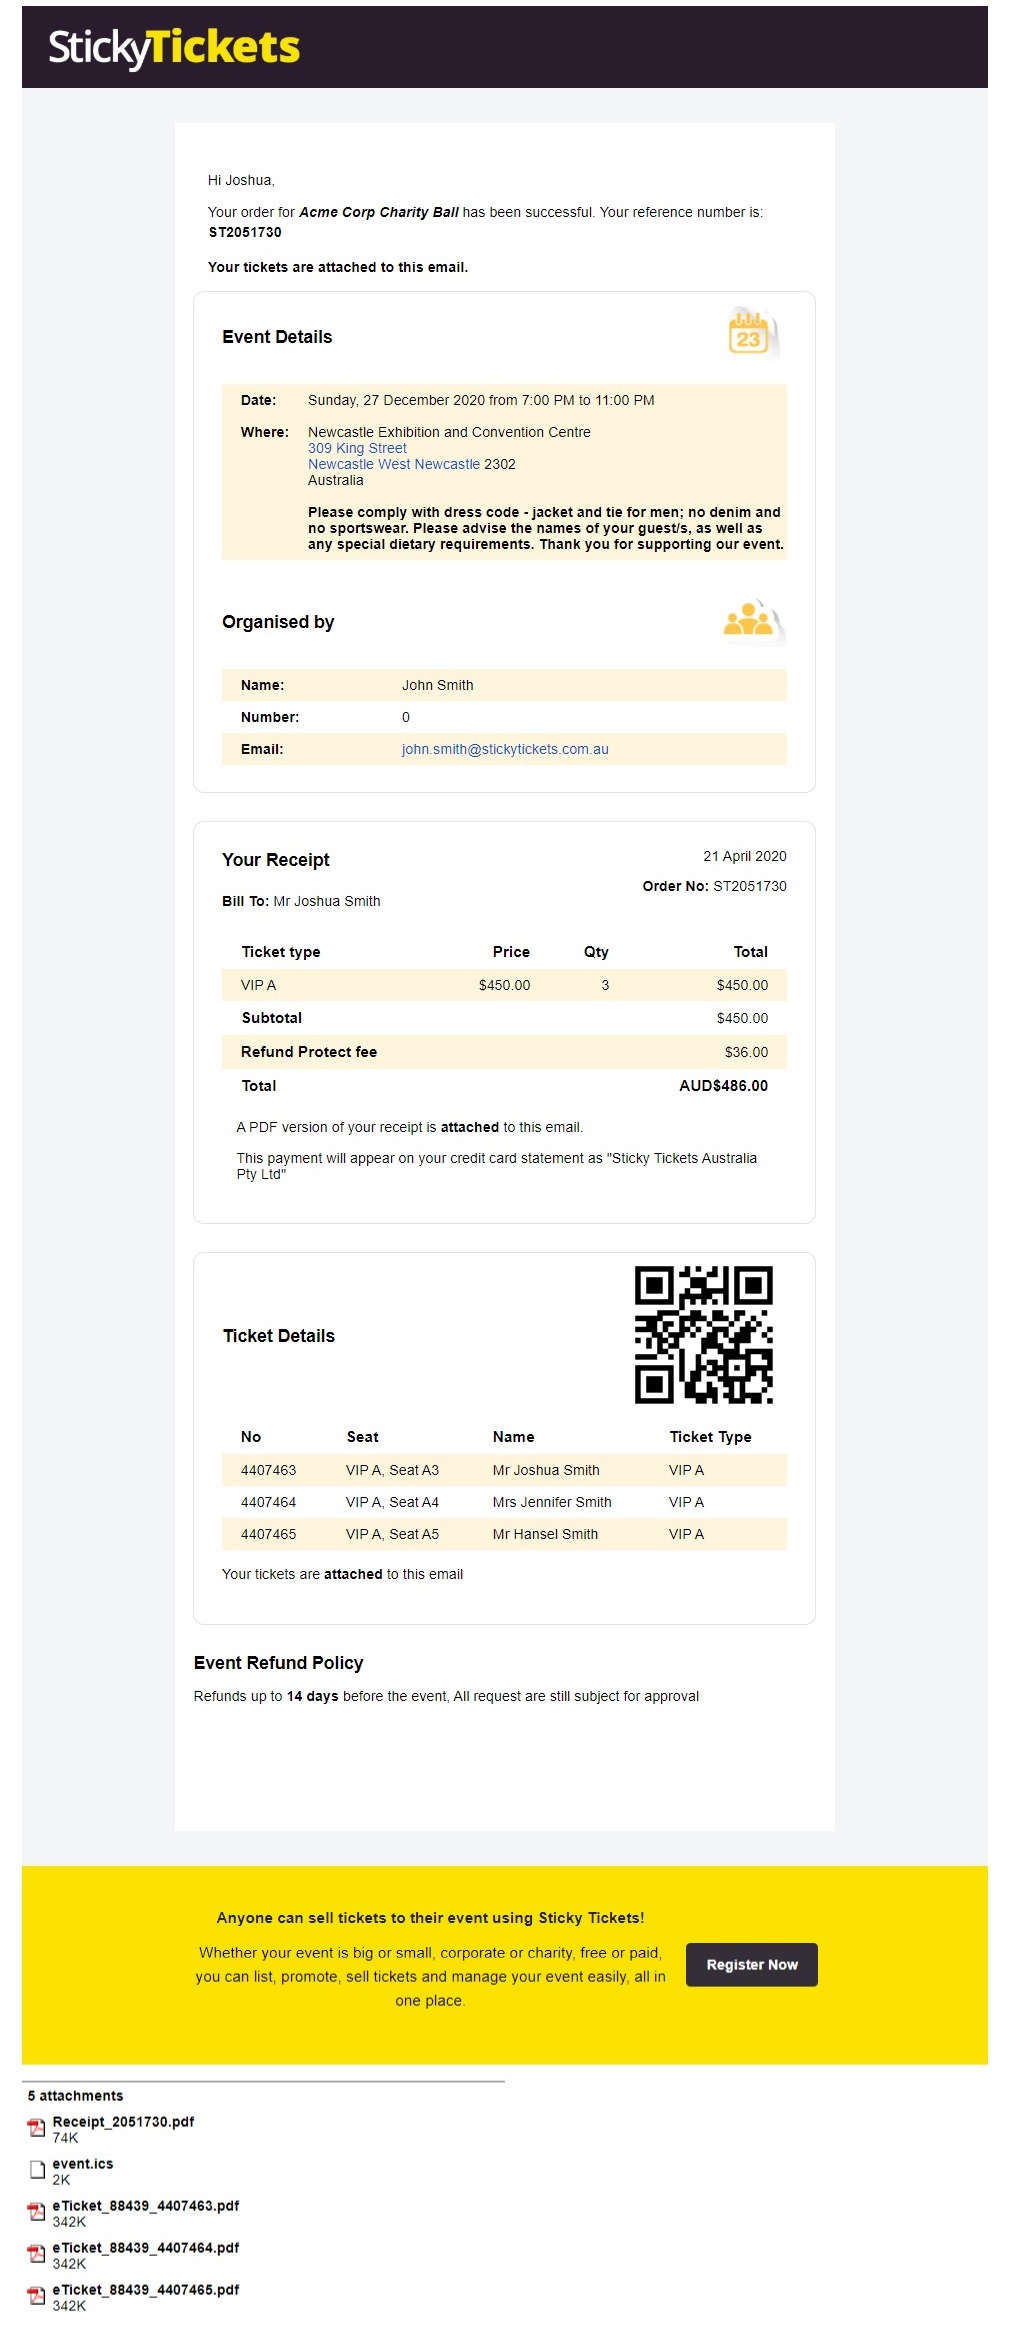
When a customer purchases a ticket to an event, we send them a confirmation email on your behalf, including the purchaser's details and PDF attachments of the e-tickets and receipt (please click here)
If you have any questions regarding this or anything else, please don't hesitate to contact us at support and we'd be happy to help.
Related Articles:
I want to add a message to my e-tickets and confirmation emails
-
How can people find my event on the Sticky Tickets website?
People can find your event page on our site through:
- The Sticky Tickets homepage – if you mark your event as searchable
- The Sticky Tickets search engine
Or, if you’re sending out a flyer or invitation, you can include your own unique URL to send people directly to your event web page and allow them to purchase.
Please contact us at support any time if you have any questions and we'd be happy to help.
Related Articles:
- The Sticky Tickets homepage – if you mark your event as searchable
-
Can I keep my event private / for invites only?
You can restrict access so your event web page is only viewable to those you invite. When you are setting up your event you will come across a check box in the 'Privacy' section, asking whether you wish to make your event searchable. Simply leave this box unchecked and your event will only be seen by those invited.
-
I haven’t received my ticket revenue as a deposit in my bank account?
We require you to complete a bank verification process before you start receiving money from your ticket sales.
If you haven't received your ticket sales, double check that you have:
- Correctly entered your bank account details.
- Received your 1 cent deposit from Sticky Tickets and entered the deposit reference number into your organiser admin area.

You can view if the 1 cent has been deposited to your nominated bank account by going to the Transactions tab:
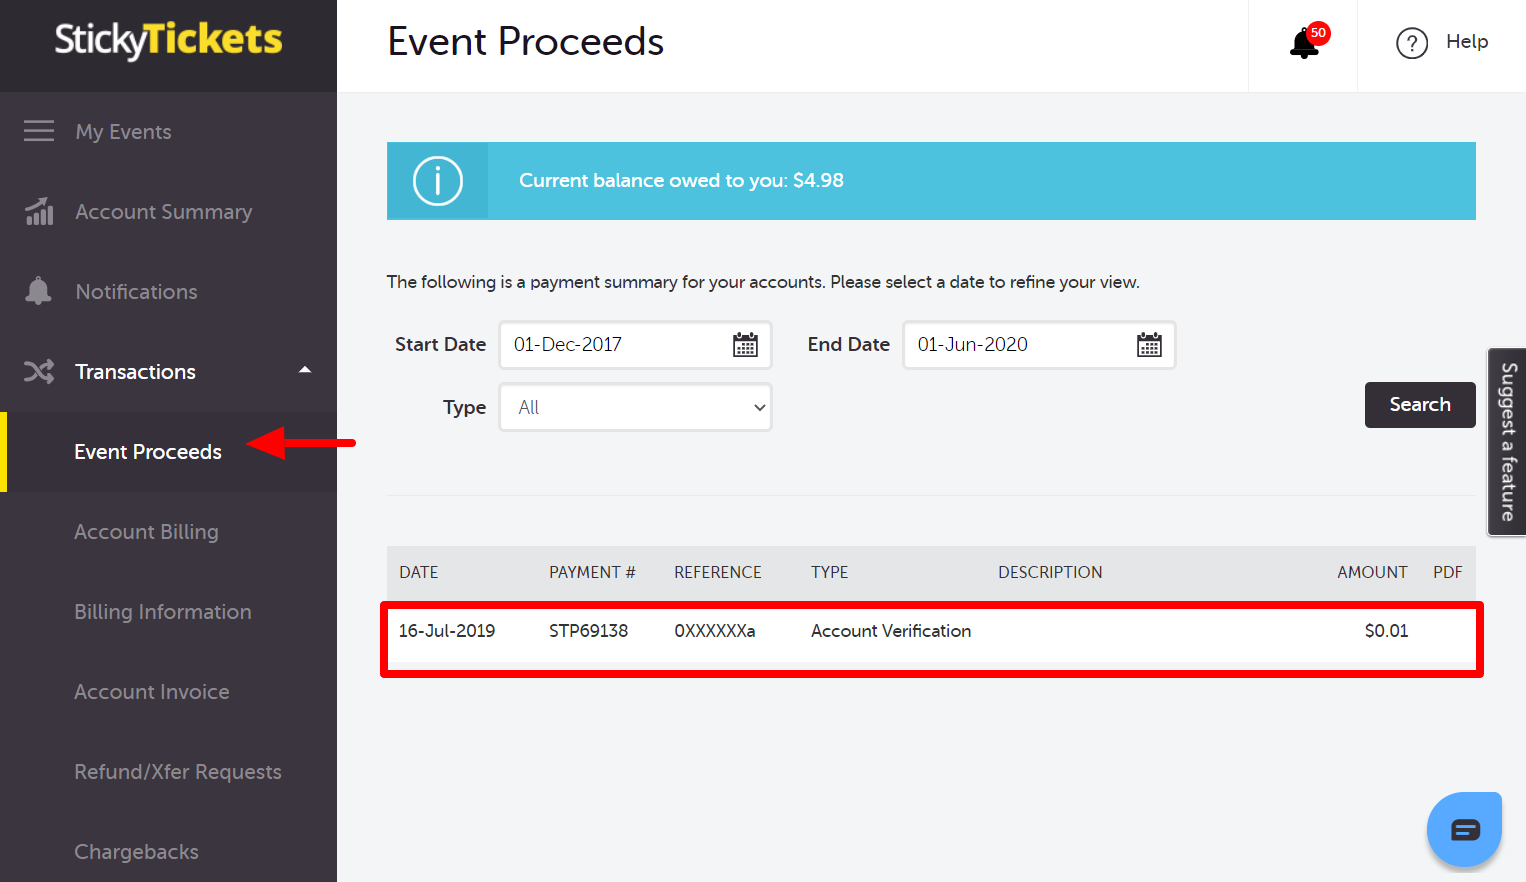
You are still able to sell tickets to your event prior to completing the bank verification process. We simply collect the funds on your behalf until you are ready to receive them.
If you have any questions about this or anything else, please don't hesitate to contact us and we'd be more than happy to help.
Related Articles
When do I receive the revenue from my ticket sales? -
What are offline ticket sales and how do I process them?
Offline sales are tickets sold through means other than Sticky Tickets. This can include phone or fax orders via credit card, a cash transaction, or payment via cheque or direct deposit. You can manually enter these purchases so that your event records are kept up-to-date and your customer can still receive an e-ticket and receipt via email. You can also use offline sales to enter VIP, free or discounted ticket details.
If you are not processing a credit card when using the offline sales feature there are no booking fees applied.
If you have any questions about this or anything else, please don't hesitate to contact us and we'd be more than happy to help.
-
What do I need to do when my event is finished?
Once your event has been successfully completed you will need to log in to your user account and officially mark it as 'complete'. To do this, log in to your account and click on the event. This will open to the summary page. In the top right hand corner, click on the 'complete' button.
To see the process in more detail please click here
If your bank details have been verified, you can expect all ticket revenue to be deposited into your nominated account within 2-3 working days.
If you have any questions about this or anything else, please don't hesitate to contact us and we'd be more than happy to help.
-
Can I use Sticky Tickets to sell raffle tickets?
-
Automating the e-ticket and tax receipt delivery
Sticky Tickets gives you the option of sending out e-Tickets and tax receipts by email, automatically upon purchase. This is the default setting. If you do not want to provide tickets for your event or would like to send tickets via alternate methods, you are able to deactivate the email ticket mechanism in the set up of each new event via a checkbox. To locate the settings, you can watch our quick demo or follow the steps below:
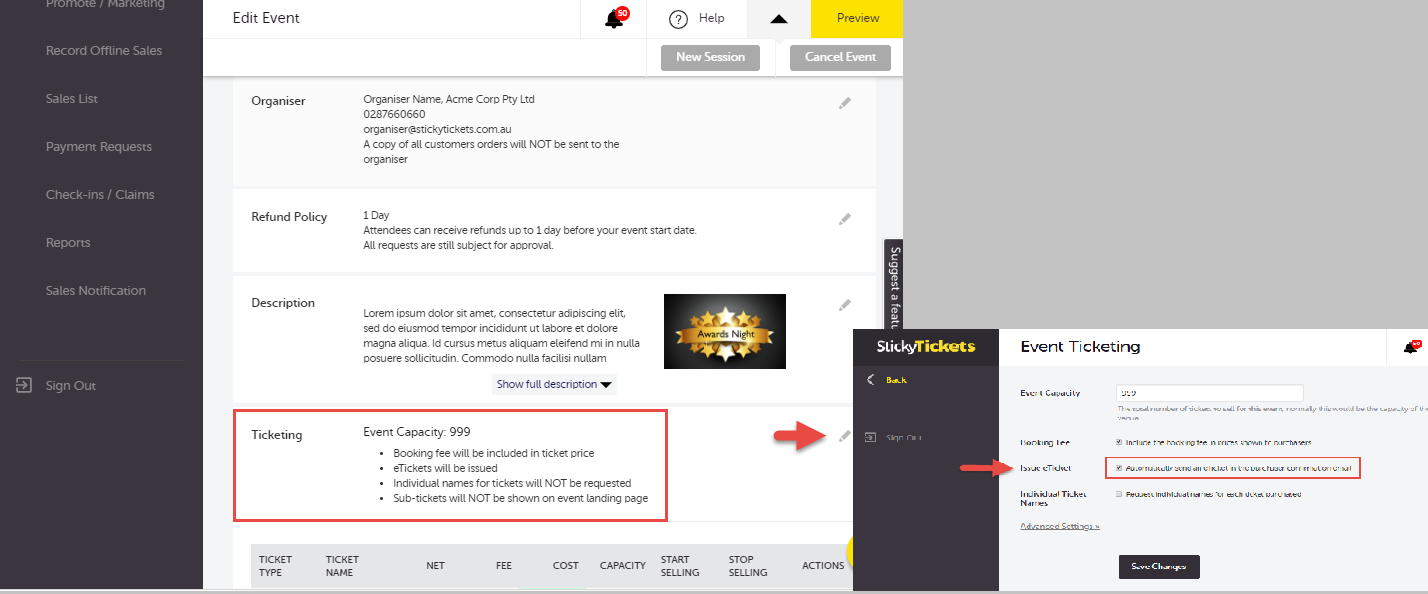
Note: As the organiser, you will receive email copies of all receipts/tickets sold. (see below)For more details on event set up please click here
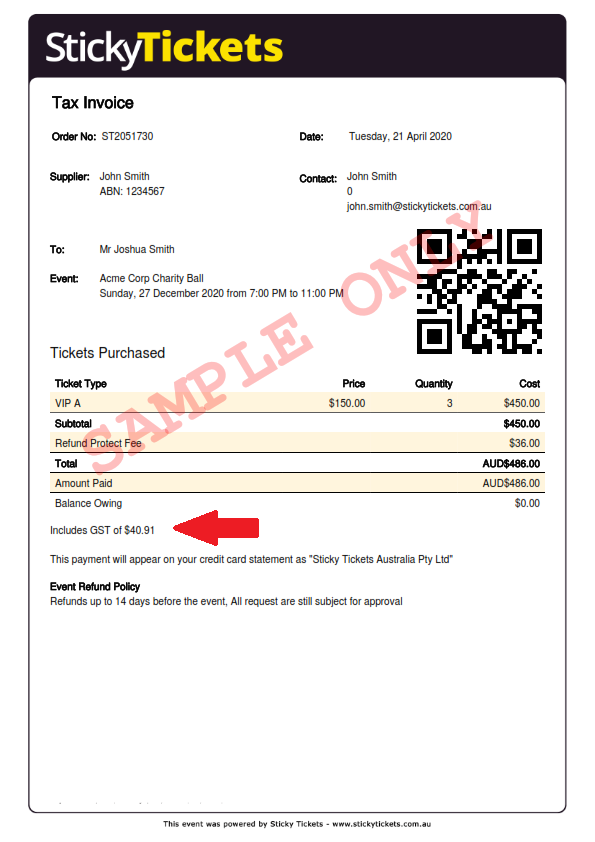
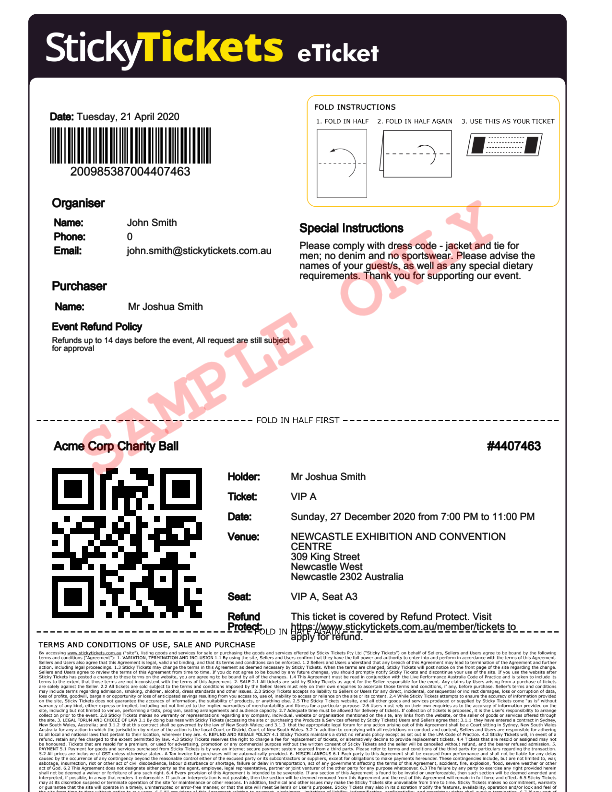
If you have any questions about this or anything else, please don't hesitate to contact us and we'd be happy to help.
Related Article:
-
How do I become an event organiser on Sticky Tickets?
Becoming an event organiser is easy, without any cost or commitment. This means you can create an account and set up a dummy/test event to simply get a feel for the features before you list an event. You can watch our quick demo, or follow the steps listed below:
Option 1 - First time user of Sticky Tickets (view short video)
1. Go to the 'How it Works/Sell Tickets' section of the Sticky Tickets website at www.stickytickets.com.au/sell-tickets
2. Click on the button labelled SELL TICKETS TO YOUR EVENT

3. Enter your email address and select a secure password.
4. Select Organiser account type.

5. Fill in the required information and at the end of the form select Complete Registration.

6. An email verification email will be sent to your registered email address. To verify your account click on the link in this email


Once your account email address is verified, you can now log in to your account.
That’s it! Now you can start to list events. Please contact us at support if you have any further questions or need help.
Option 2 - Previous user of Sticky Tickets
If you have purchased tickets from Sticky Tickets before, all you need to do is change your account to an organiser account. Just follow the instructions below:
Visit www.stickytickets.com.au
Log in with your current details using the link at the top right of the screen.
Once you're logged in, you can either
- Click on My Events and follow the prompts
- click on the link that reads Become an Organiser in the expanded menu on the right side of the page .

Organisation Type - Select what type of event organiser you are (an individual, business, not for profit or registered charity).
When you're finished, click the Become an Organiser button.
A couple of important points:
- You are still required to enter your bank details in order to receive ticket sales, though you can do this at a later stage. To enter bank details, click on the My Account link at the top right of the page.
- Funds are transferred into this account after the event has been completed.
An email verification email will be sent to your registered email address. To verify your account click on the link on this email

Once your account email address is verified, you can start creating your event!
If you have any questions regarding setting up your event and or anything else as you go, please don't hesitate to contact us at support any time and we'd be more than happy to help.
Related Articles
How to convert Member account to Organiser Account?
-
Can I use Sticky Tickets for a webinar?
Absolutely! When creating the event, just enter something like "Online" or "Your Place" in the address field.
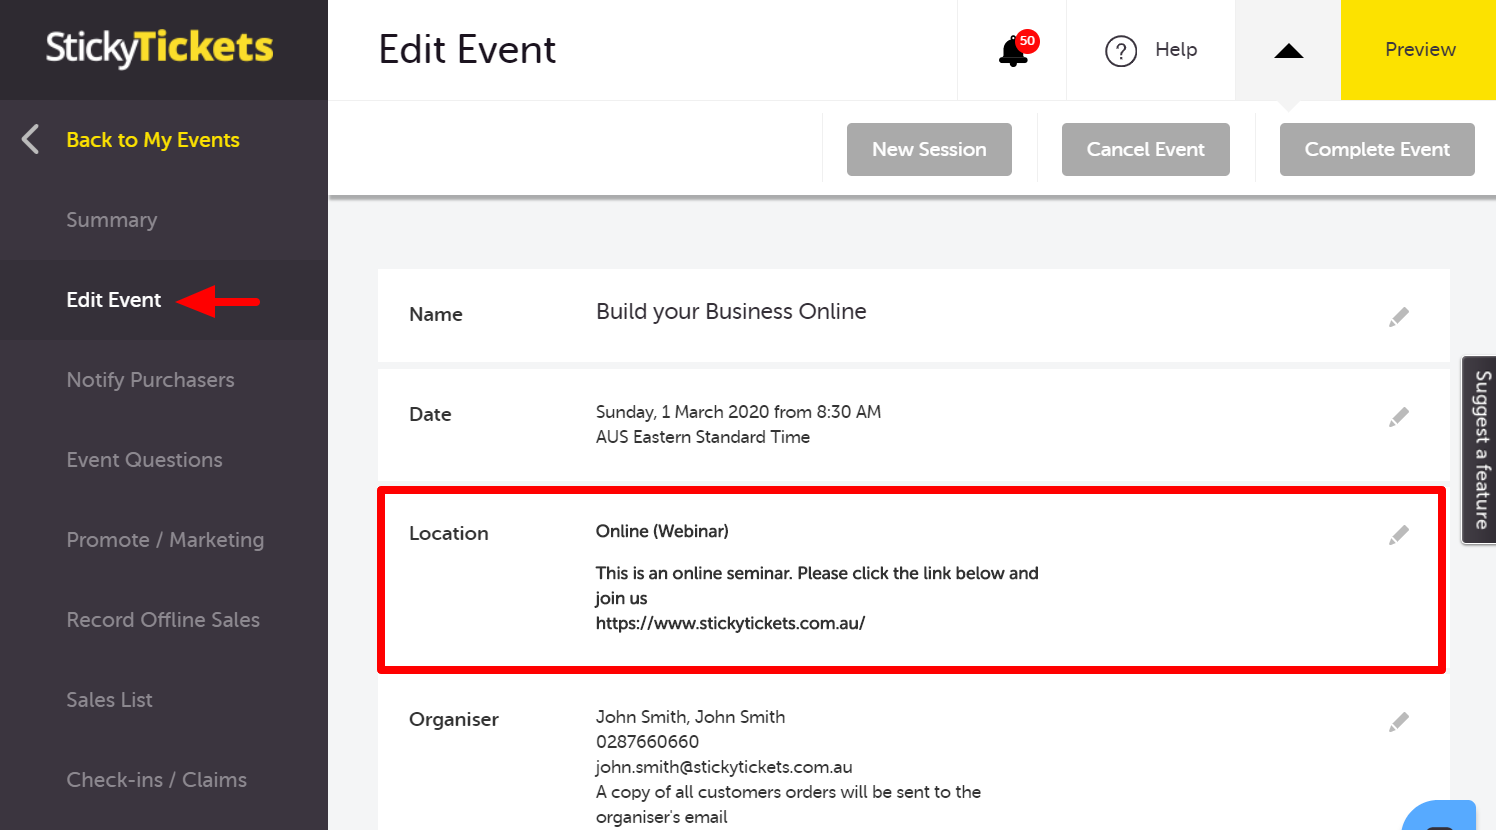
You can also select not to send out e-tickets (a receipt will still be sent) and you can add a message to the confirmation email and receipt with the webinar link. This link will only be displayed once a purchase is complete.
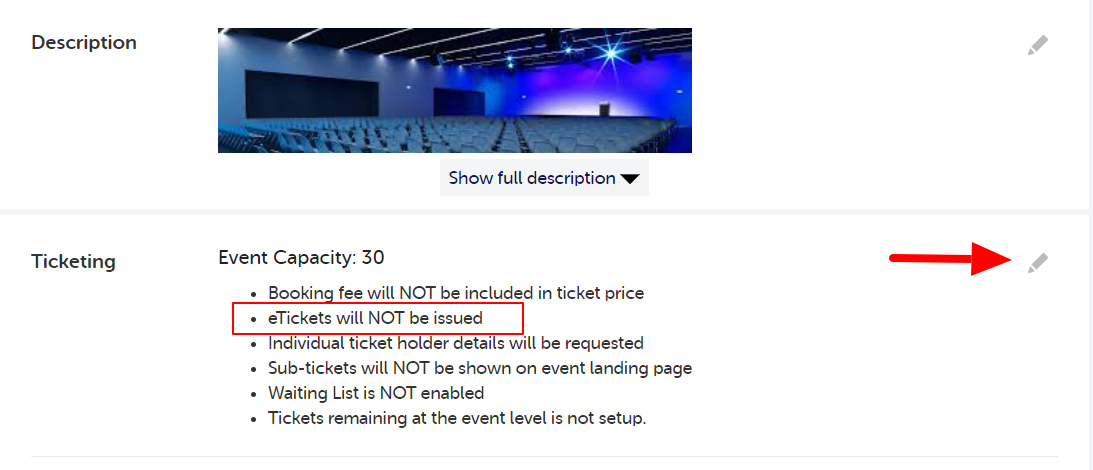
For more details on how to add this message please see adding a message .
If you have any questions about this or anything else, please don't hesitate to contact us and we'd be more than happy to help.
-
Receipt vs tax invoice
When a ticket purchaser buys tickets, along with their e-ticket they will either receive a Receipt or Tax Invoice.
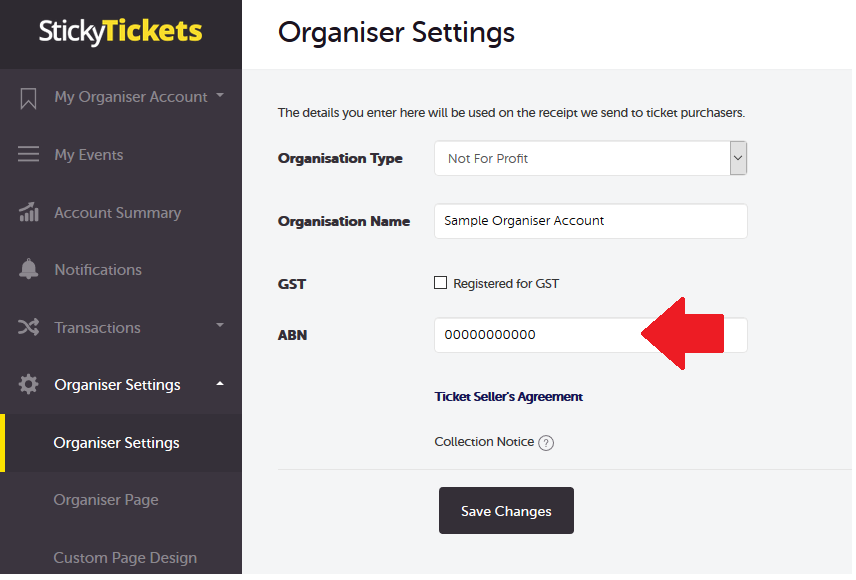
- Tax Invoice - A tax invoice is only issued if your organiser settings are set as registered for GST (as an ABN is required to be displayed on a tax invoice)
- Receipt - A receipt is issued in all other instances except for the one above when an ABN has been provided.
Note: Charity and Not for Profit organisations can just enter their ABN numbers (screenshot added below)
If you have any questions about this or anything else, please don't hesitate to contact us and we'd be more than happy to help.
Related Articles:
-
Can I make my event environmentally friendly?
Yes! There are several ways you can do this:
* There is no need to print tickets. Add a note to your event letting ticket purchasers know that they do not need to print out their e-Tickets. They can either have them scanned on their mobile device at the entrance, or show the ticket on their mobile device to have their name checked off.
* There is no need to print reports. Keep all of your reports online - they are updated automatically with each purchase.
* Send invitations electronically
* Set up recycling stations at your event
* If your event is held annually do not print the date on the promotional material, so you can use extras again next year.
-
How to make your event live
Once you have finished entering/updating the details of your event, you are now ready to schedule on when your event go live or make it 'live' right away to begin advertising/selling tickets online. Until your event is Live, this will display a 'Pending' or 'Scheduled' status, which means it will not appear online and people will not be able to buy tickets. You will still be able to make changes to the event details.
To find out how to make your event live, please watch this short video or follow the steps below:
If you are not ready to make your event live, you can use the Save For Later button to save your current changes and return to the event list page.
1. Use the Preview link to view your event page as ticket purchasers will see it
2. Click Make Event Live button and choose whether you make the event live now or schedule it for later
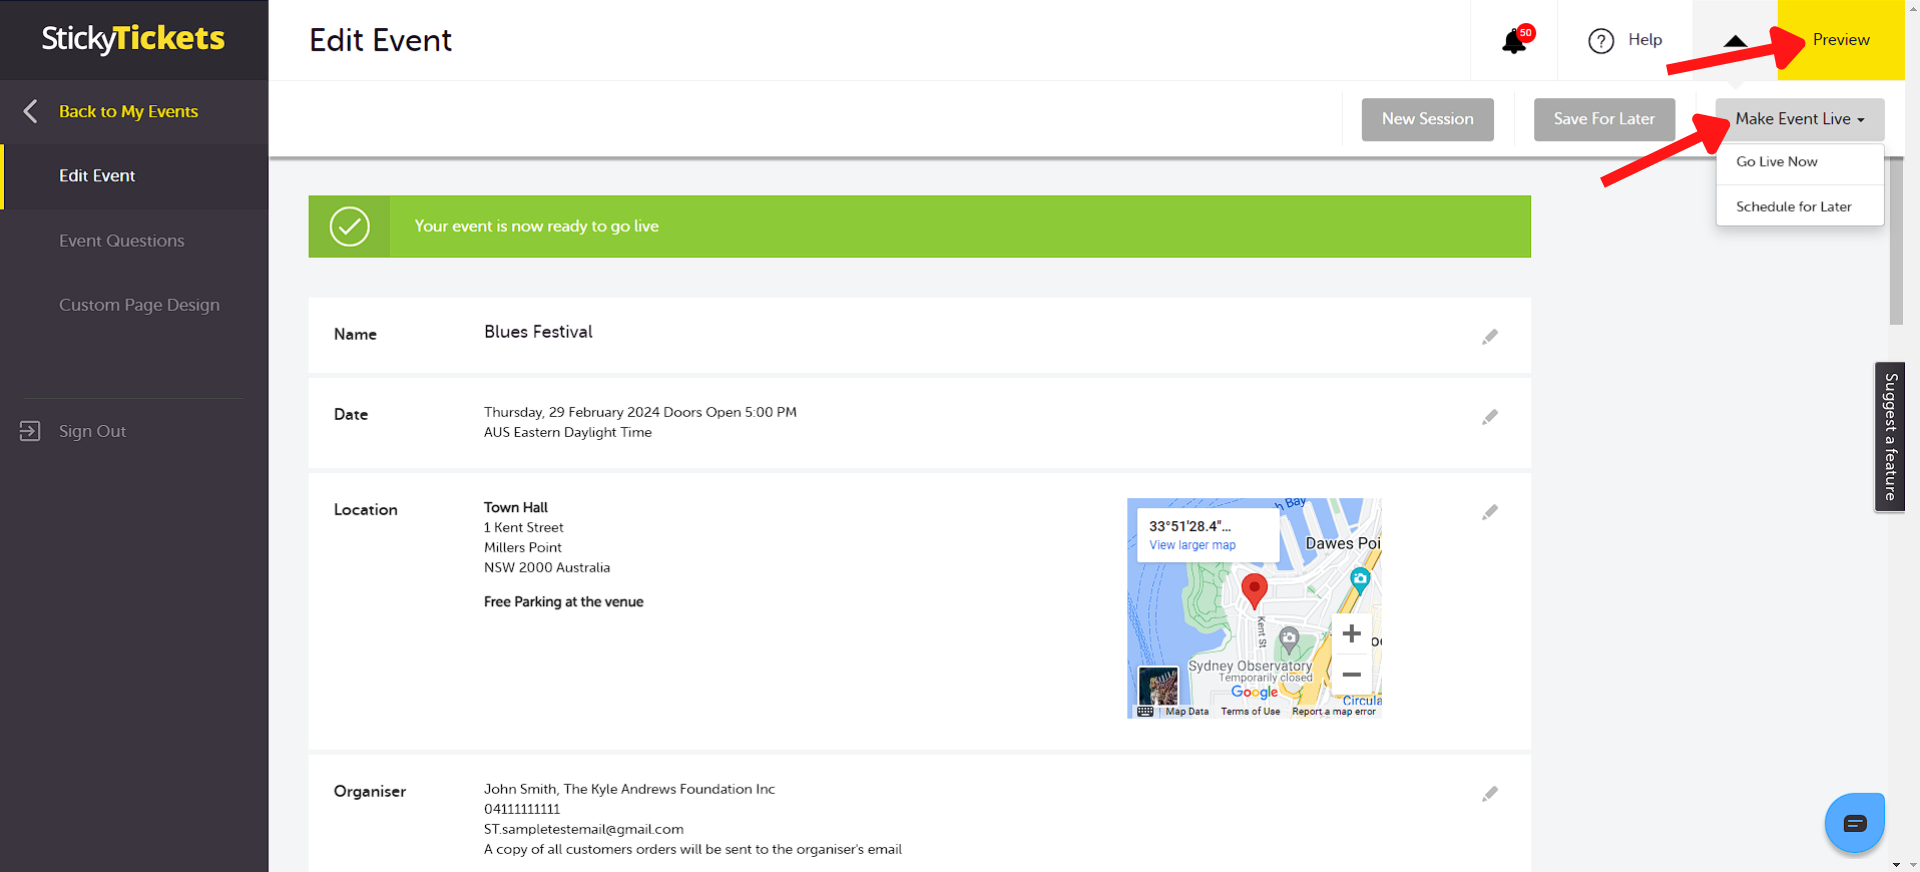
For mobile devices:

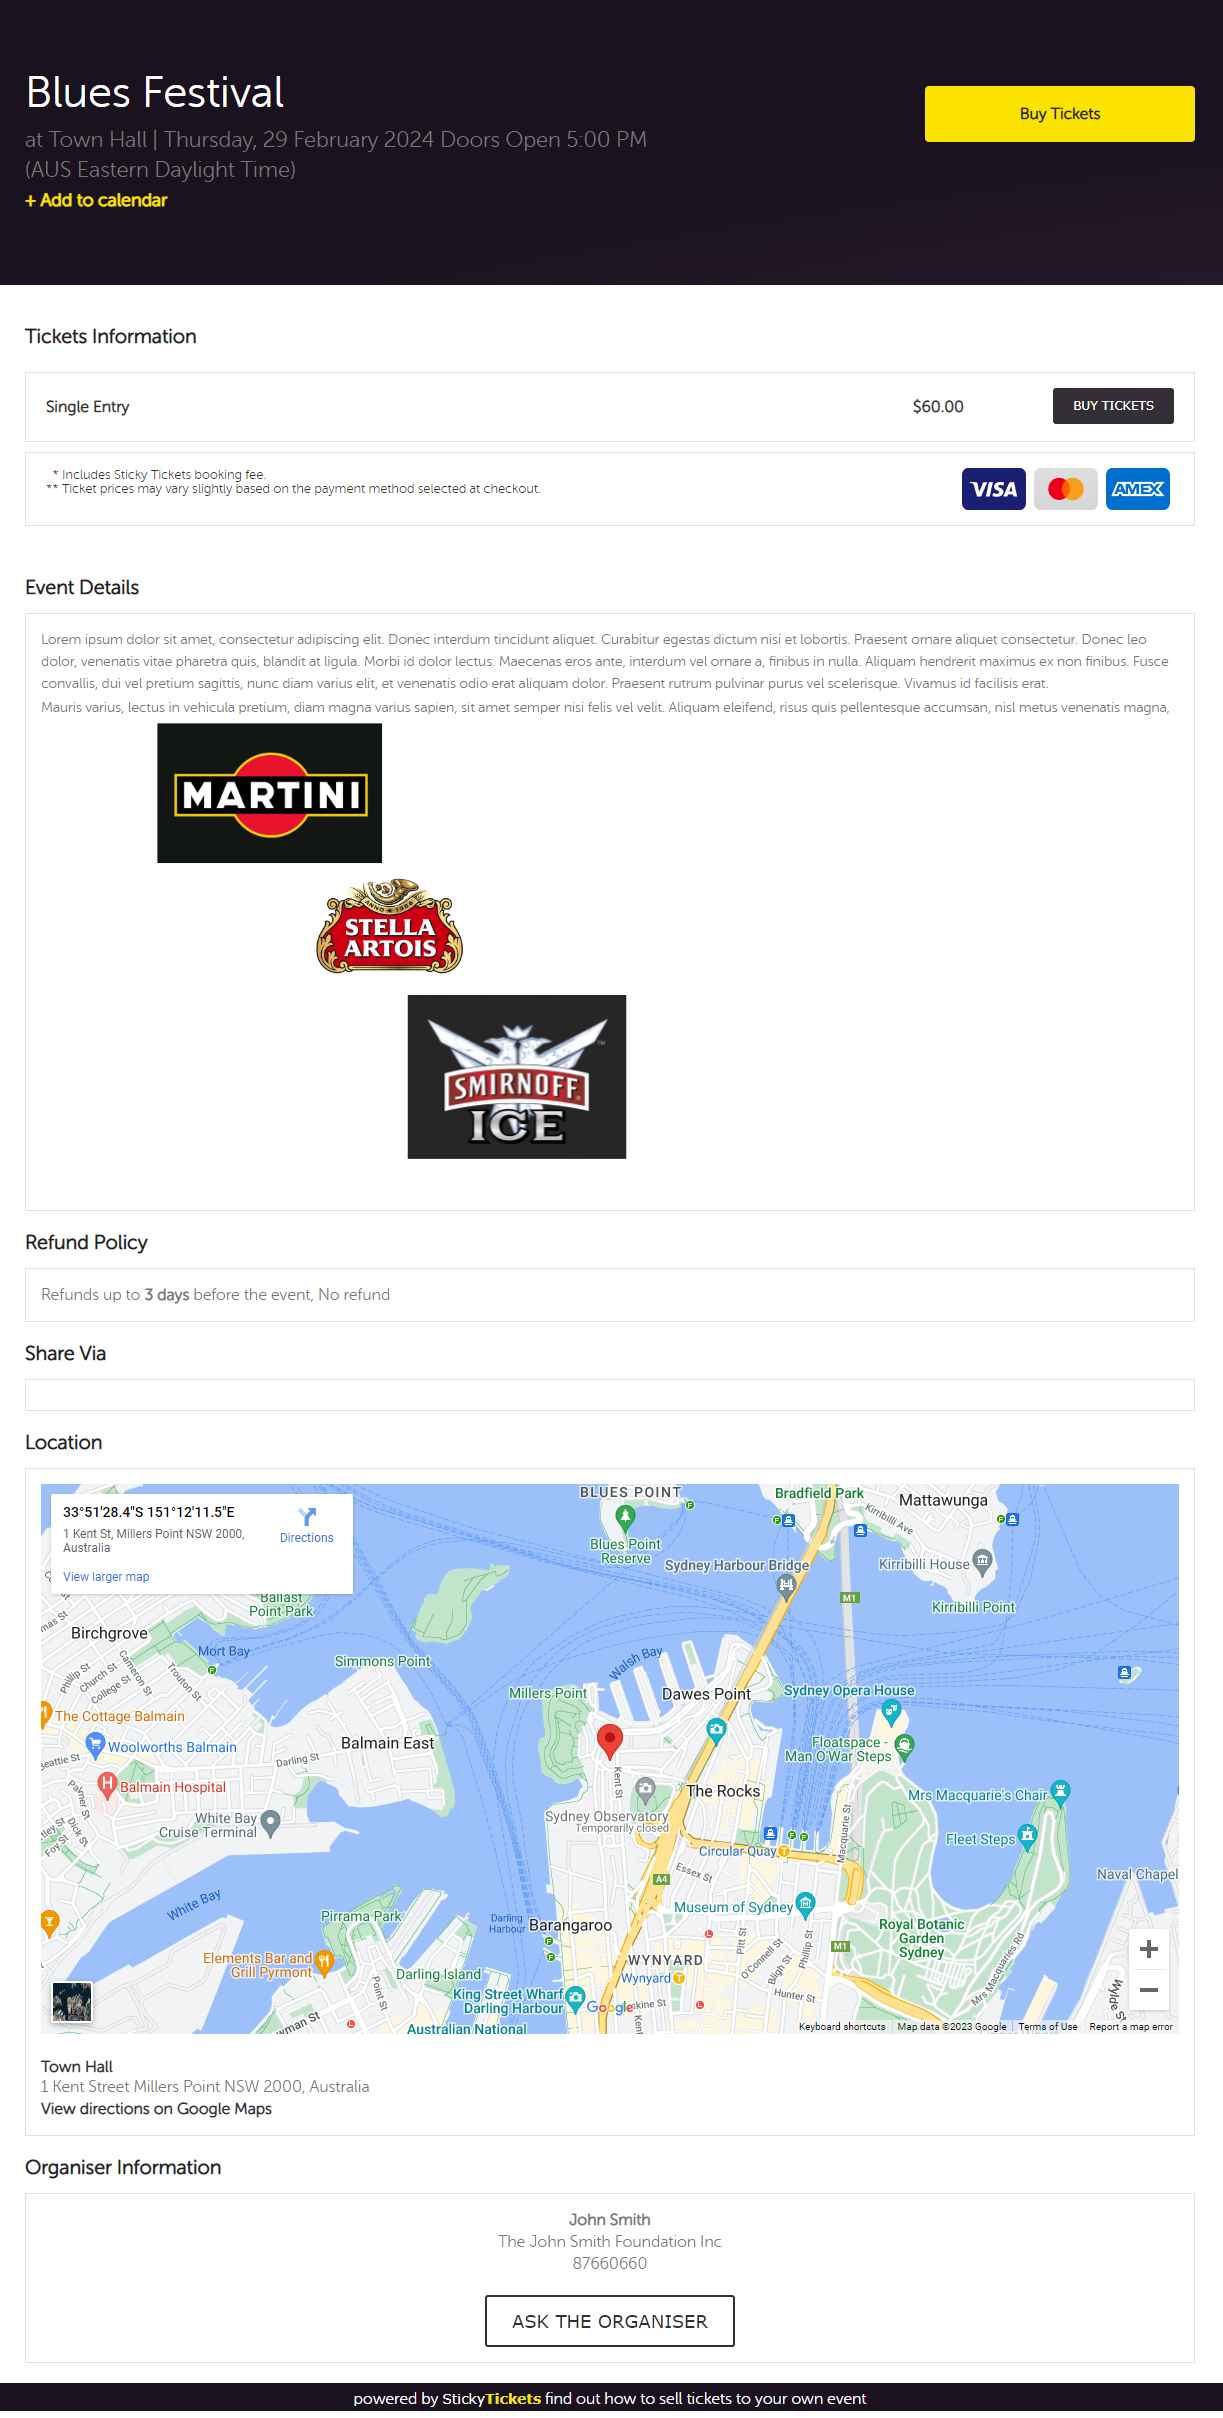
Your event page on Sticky Tickets will look similar to the example shown here.

If you have questions about making your event live or anything else, please contact us at support any time and we'd be more than happy to assist.
-
How to delete events?
Events can only be deleted when the event is still in pending status or when it's marked as cancelled without any ticket sales. You can click on the delete link under the Actions tab in your My Events tab.


Note: Cancelled events with ticket sales will not be deleted for reporting purposes.
If you have any questions about this or anything else, please don't hesitate to contact us and we'd be more than happy to help.
-
What are my legal obligations as an event organiser?
Your Legal Obligations as an Event Organiser Under Australian Consumer Law
Australia Consumer Law is a set of obligations for businesses engaging in trade or commerce, which protects the rights of consumers. To help you remain within the guidelines, here are some considerations to take in the organisation of your event.
- Ensure you secure appropriate approval/permits from the venue, prior to selling tickets.
- Clearly list the contact details of the organiser, so that consumers can communicate directly if needed.
- Regularly meet with all of those assisting with the planning and organisation of the event, to make sure it is all going sufficiently and successfully
- Provide a thorough brief to food and drink vendors to ensure numbers will be catered for adequately, at appropriate times.
- Ensure the quality and quantity of facilities on site, particularly with regards to the number of attendees.
- Ensure that any promised merchandising stock will arrive in a timely manner and in adequate quantities to supply all consumers.
- Ensure there are adequate staffing levels to manage crowds on the day.
- Develop a plan of action for extreme weather events.
- Consider the conditions under which you would provide a refund and ensure your ticketing agent is part of that process, in case of significant problems prior to or during the event.
- Thoroughly brief all event staff working during the event to ensure they are all aligned regarding event management procedures and contingency planning.
- Ensure event staff can communicate effectively with each other as well as event managers and local authorities during the event.
Consumer guarantees and refunds
- Pop-up events involve supplying consumers with a service (the experience). Under the ACL, suppliers automatically provide guarantees on the goods and services they provide to consumers.
- A supplier guarantees that services are provided:
- With due care and skill
- Which are fit for any specified purpose
- Within a reasonable time (when no time is specified).
- In the case of any goods provided, a supplier guarantees (among other things) that:
- Goods are of an acceptable quality
- Goods will match any description provided
- Events involving supplying consumers with a service (the experience) means that suppliers automatically provide guarantees on the goods and services they provide to consumers, according to Australian Consumer Law.
- If the good or service fails to meet a consumer guarantee, a consumer has rights against the supplier, who must provide a remedy promptly. In the case of major failures, ie cancellation (where a consumer would not have purchased the good or service had they known the extent), the remedy is normally a refund. If you have to reschedule your event and the ticket purchaser is unable to attend the new event date, they are entitled to a refund, including booking fees.
- Consumers may be entitled to a full or partial refund if the service is not provided to the extent of the promise.
- The ACL prohibits the use of unfair contract terms, including all Terms and Conditions which consumers must agree to when purchasing tickets. This includes terms which limit the liability of the organiser in providing refunds or other remedies. You can state that refunds will not be given for change of mind purchasers.
- Event organisers are encouraged to proactively provide consumers with as much information as they can about the circumstances when they would be entitled to refunds. For example, Terms and Conditions could clearly advise consumers they are entitled to a refund if an event is cancelled or if the headline act is no longer attending, or in the event of a postponement of an event that organisers would offer consumers tickets to the alternate date or the consumer can choose a refund.
- It is misleading for event organisers to accept payment for event tickets (or allow their ticketing agent to accept payments) if they:
- do not intend to put on the event,
- intend to put on an event different to the event advertised, or
- know (or should have known) or were reckless to the fact that you would not be able to put on the event.
- If you do accept payment in the above circumstances, you may be committing an offence.
- The law is not intended to punish businesses that genuinely try to meet supply agreements, however, event organisers should communicate any alterations to an event as soon as possible and as widely as possible and offer appropriate remedies in response to failures of any consumer guarantees so consumers can make informed decisions.
- Ultimately, event organisers are encouraged to review their practices to ensure they are operating with the ACL, and make sure to remedy situations with a ticket purchaser if they are not satisfied.
*This information is provided as a guide only. For more detailed information regarding the requirements of both event organisers and ticketing agencies, please visit the ACCS website, or your local consumer affairs regulator.
-
I received an error message
If you received an error message while purchasing a ticket or while setting up/managing your event, please describe the error, take a screenshot and send us a copy via email so we can investigate further.
You can send us a message through the Contact Us page and we will begin work on resolving the issue as soon as possible for you.

-
Creating Group Discounted Tickets - Group Ticket Type
Offering group and bundled tickets can be a powerful strategy to boost ticket sales and attract more attendees to your event. Examples of these bundles are:
- Buy one, get one free
- Group of 10 Tickets
- Buy one, get one 50% off
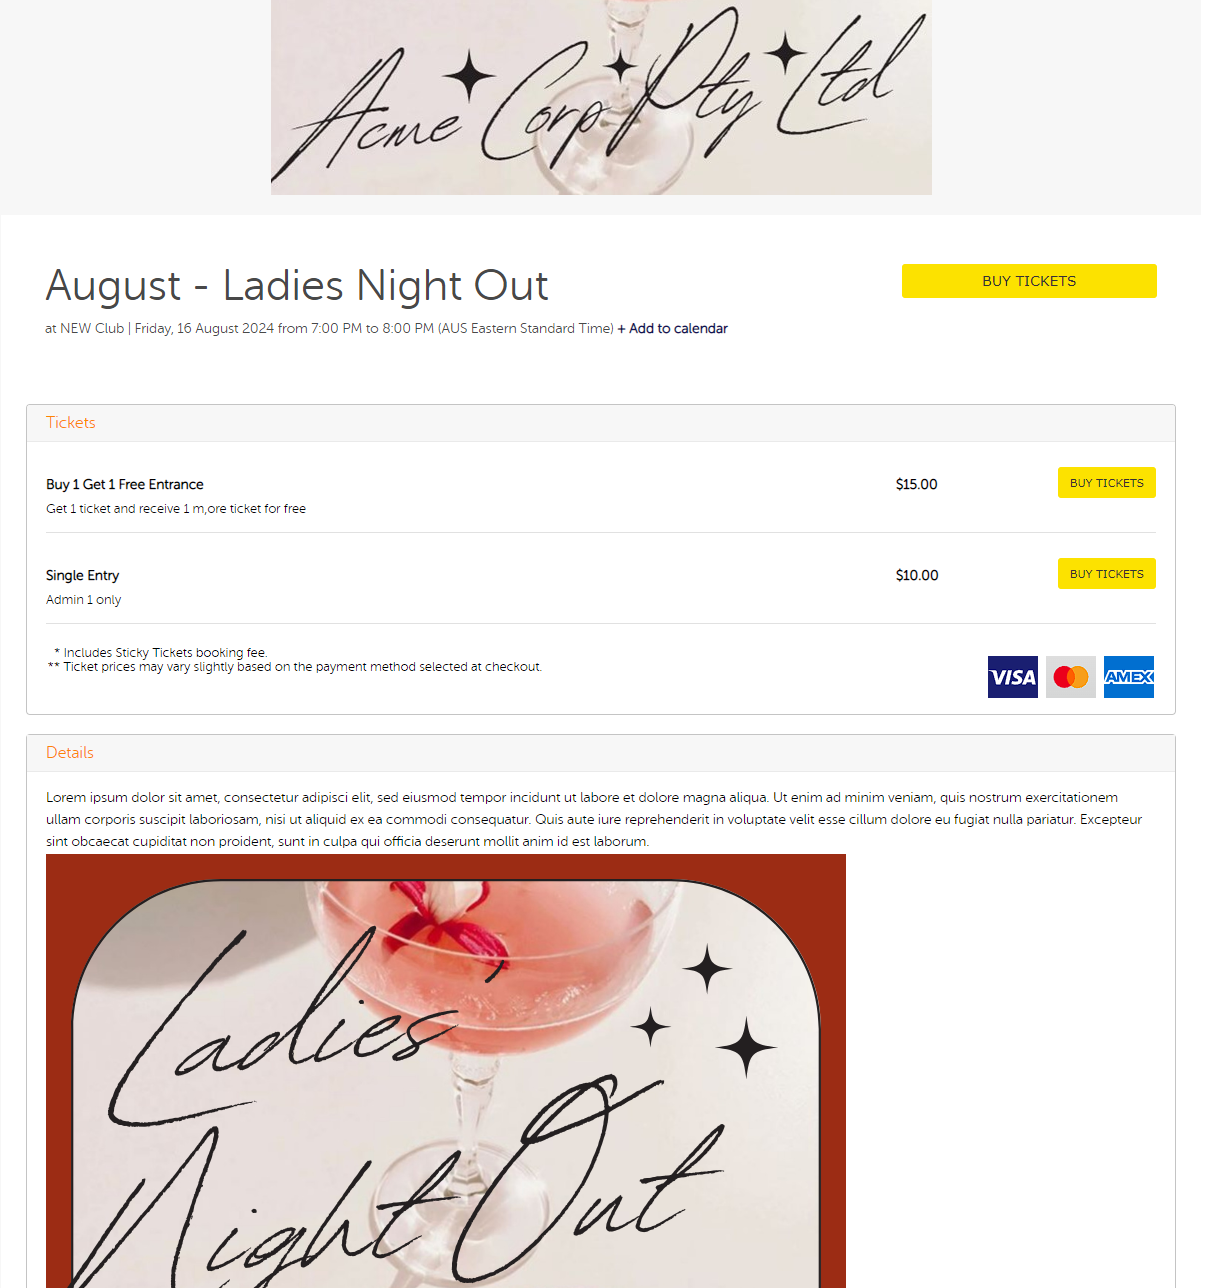
Here's how you can create these using the Group Ticket type.
1. Log in to your organiser account and open the event you wish to add this ticket type to and access the 'Edit Event' tab.
2. Scroll to the Ticketing Section and click Add New Ticket type. If you have an existing ticket type/s, you can click the 'Add Another Ticket Type' button.
3. In the Ticket type, select Group Ticket. Then fill out the rest of the settings. Below are the details and a short description of each field.
4. Once done, click the 'Save' button and the new ticket type should appear in your Ticket Type list.
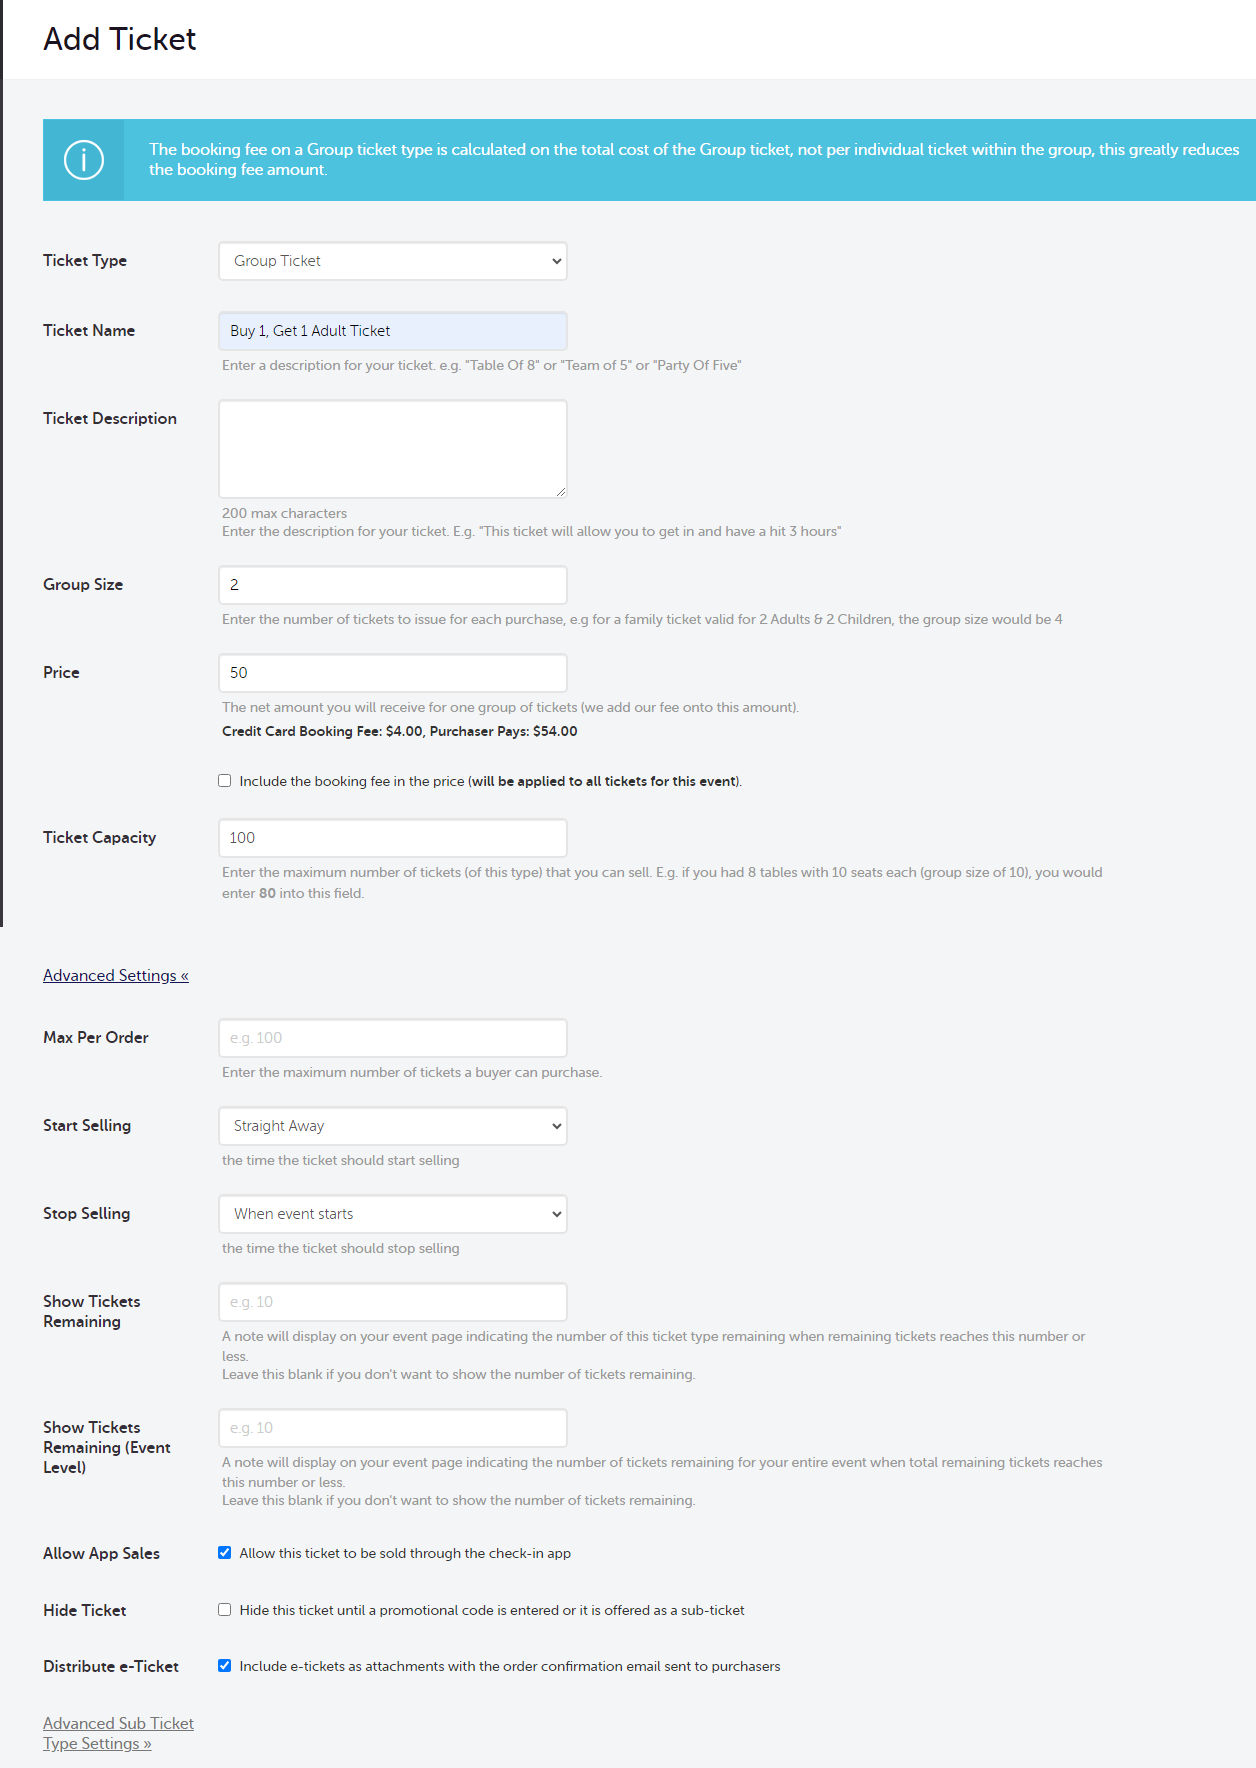
A. Ticket Type: Select 'Group Ticket' or 'Group Reserved Seating Ticket' (if you have a seating plan)
B. Ticket Name: What you would like to name the ticket
C. Ticket Description - Allows you to enter a short description about the ticket type
D. Group Size: This indicates how many tickets you want to generate for each purchase of this ticket type. For example, if you are selling "Buy 1, Get 1 Free", then you're selling 2 tickets for this, therefore your group size is 2.
E. Price: Set the price you want to sell this ticket as a group.
F. Include booking fee - this feature appears in this area when you haven't created a ticket type for this event before. This allows you to set whether the price shown will include or exclude the booking fee.
G. Ticket Capacity: This indicates how many tickets you would like to sell for this ticket type. Make sure to use a number that is divisible by this number you set for the group size field. (ie if the ticket group size is 2, make sure a ticket capacity is an even number).
H. Max Per Order: Set how many sets of this ticket type you want to sell.
I. Start Selling: Sets when you would like to start selling this ticket type
J. Stop Selling: Sets when you would like to stop selling this ticket type
K. Show Tickets Remaining: If you would like the number of tickets remaining to show on your event page. If you do not want to display the remaining tickets left for this ticket type, you can leave it blank
L. Show Tickets Remaining (Event Level) - You can specify the number you want to use as the threshold for your ticket capacity. This will display on your event page indicating the number of tickets remaining once the unsold tickets reach this number or less. Note: If you don't want to show the number of tickets remaining, you can leave this blank.
M. Allow App Sales: When checked, this will allow any event operators to sell this ticket type through the scanning app
N. Hide Ticket - Selecting this option will hide this ticket from being displayed on the event page until a promotional code is entered.
O. Distribute E-ticket - If selected, when a purchaser buys this ticket we will include an e-ticket (as an attachment) in the order confirmation email.
if you have any questions about this or anything else, please don't hesitate to contact us and we'd be more than happy to help.
Related Articles:
-
Event Ticketing Settings
This area of the event settings enables you to determine the size of your event and the manner in which tickets will be sold.
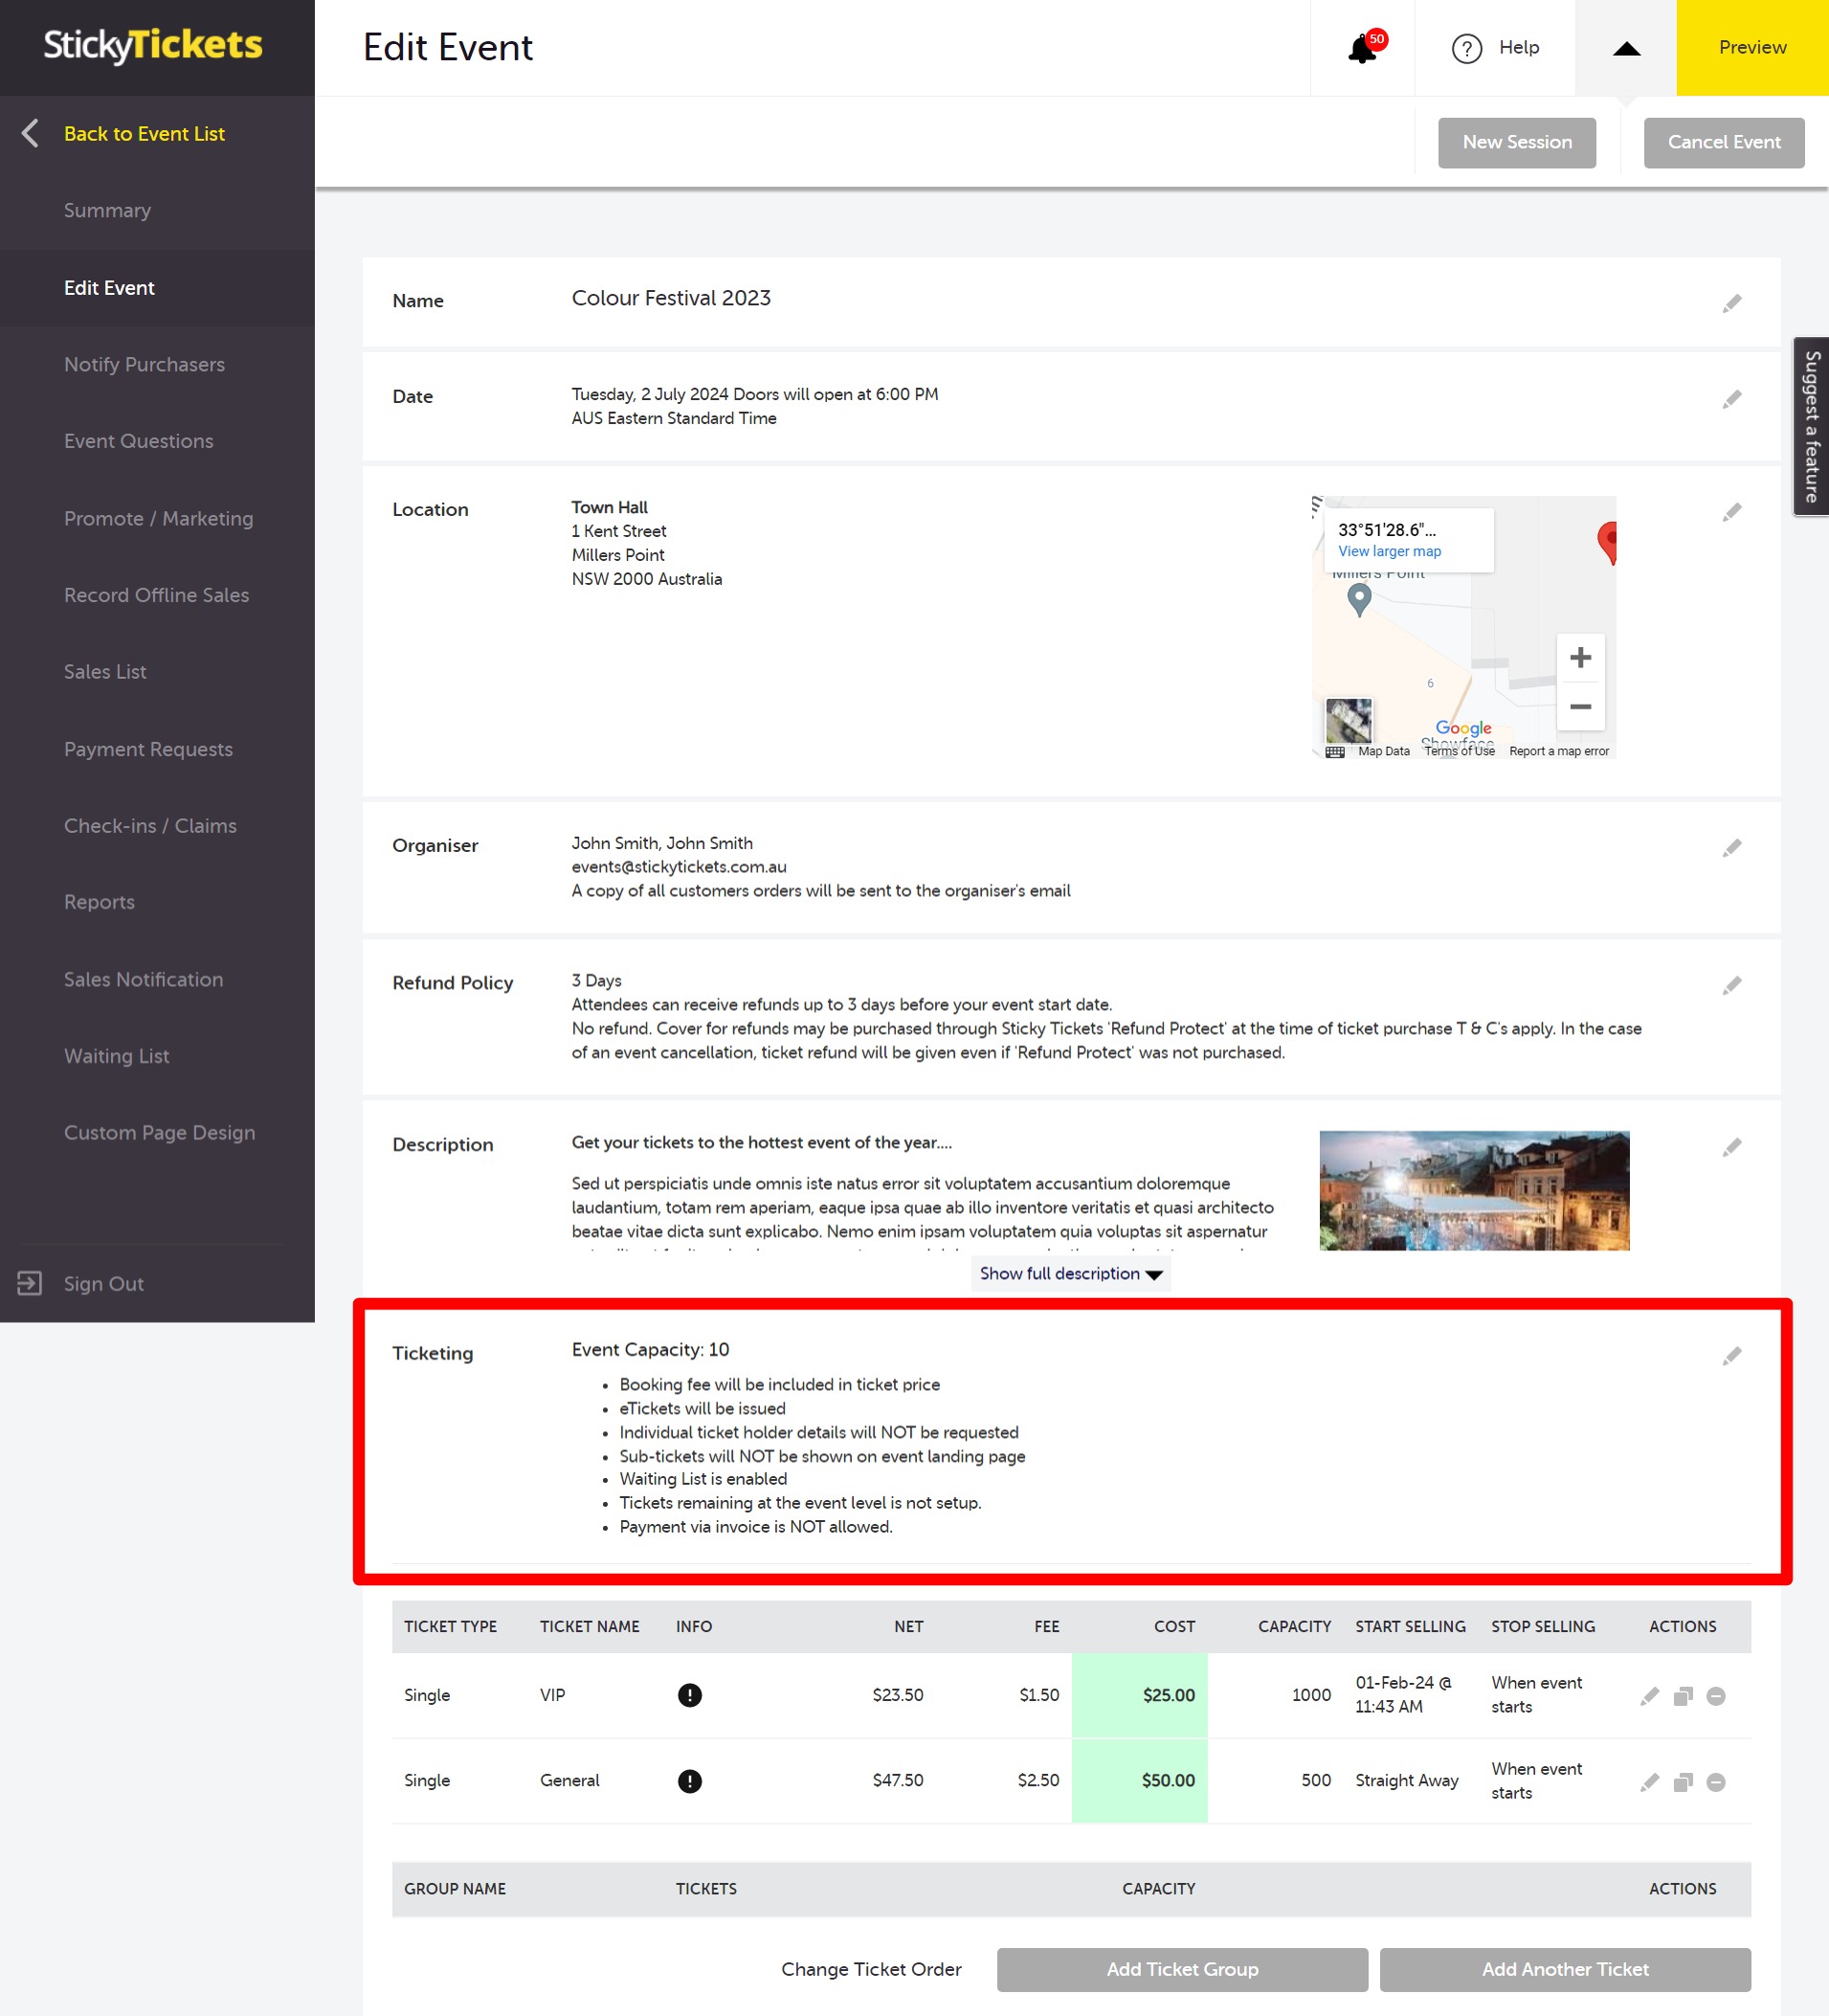
On this page, you can modify settings and also enable and disable some features. Below are the list of settings in this page and what each setting can do.
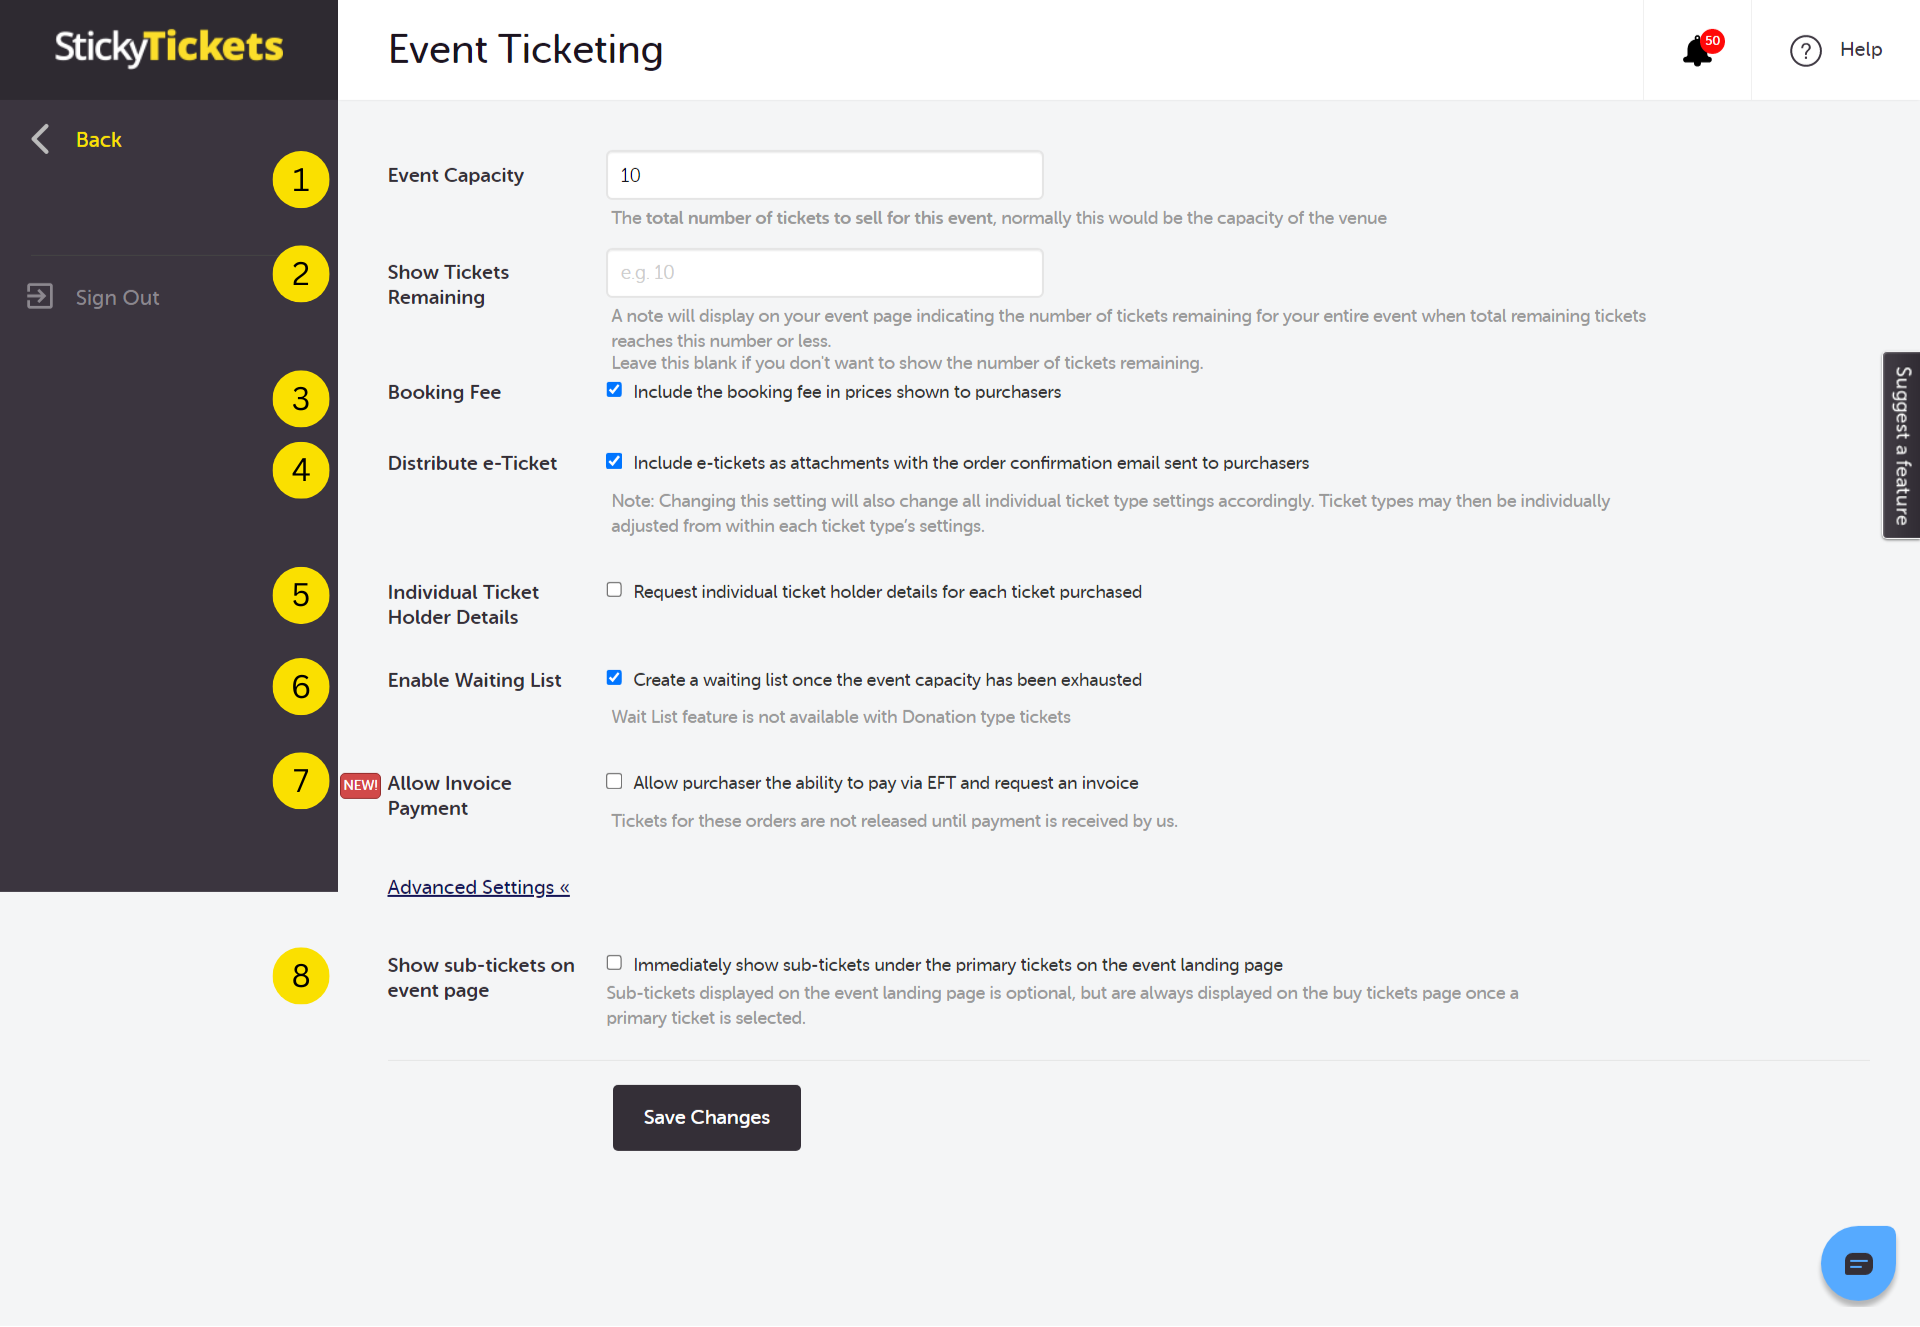
1. Event Capacity - This number represents the maximum number of tickets that can be sold for an event, which is decided based on the venue's size and capacity. To avoid selling more tickets than allowed, your event will show as SOLD OUT once this number matches the total number of tickets sold at your event. Regardless of how many ticket types you offer for sale, no combination of tickets sold will ever exceed the event capacity,
2. Show Tickets Remaining - This feature allows organisers to display how many tickets are remaining to be purchased. The number you enter here is the threshold, once the number of tickets sold reaches this threshold, the system will display the remaining number of tickets available for purchase on the event page (see the example below.). This will allow your guests to know how many tickets are left in the event. For more information about this feature, please click here.
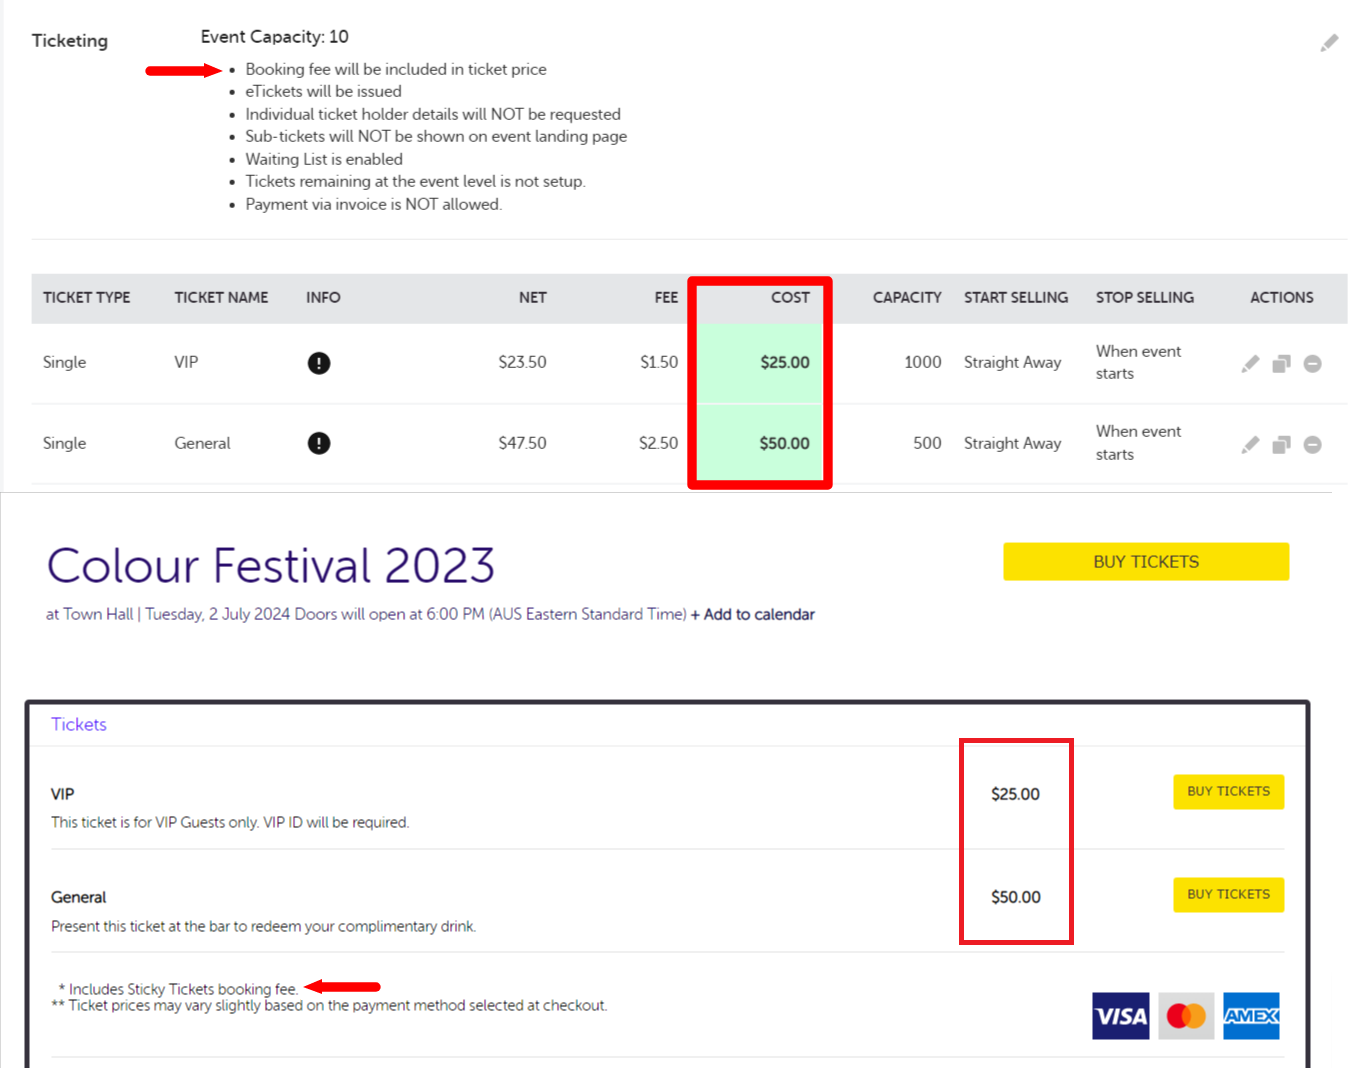
3. Booking Fee - This allows you, as the organiser; to set whether your ticket prices displayed will include the booking fee or not. If this box is checked, this means the system will include the calculated booking fee in the ticket price you set. For more information about this feature, please click here.
4. Distribute e-Ticket - By default, this box is checked when you create a new event, which means that all guests who book tickets for an event will receive their e-tickets. However, if e-tickets are not necessary, the event organiser can uncheck the box and this will exclude the e-tickets from the email confirmation.
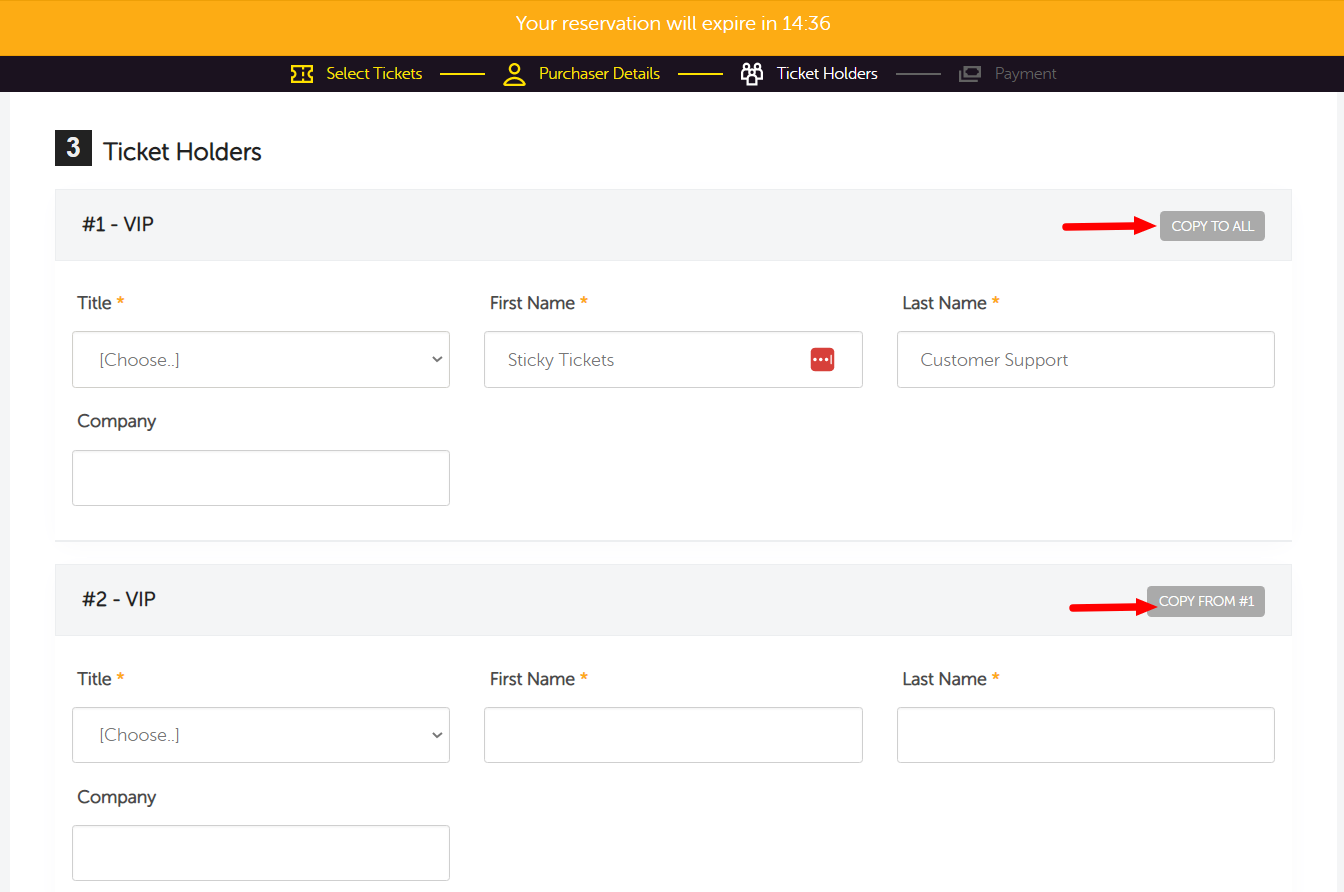
5. Individual Ticket Holder Details - If this box is checked, this sets the event to ask for individual names in each ticket booked within an order. For example, if a guest booked 10 tickets, the purchaser will need to enter the names of each ticket. Nevertheless, the purchaser can still use one name for all tickets (clicking the 'copy to all' option) if the names are not readily available (see example below).
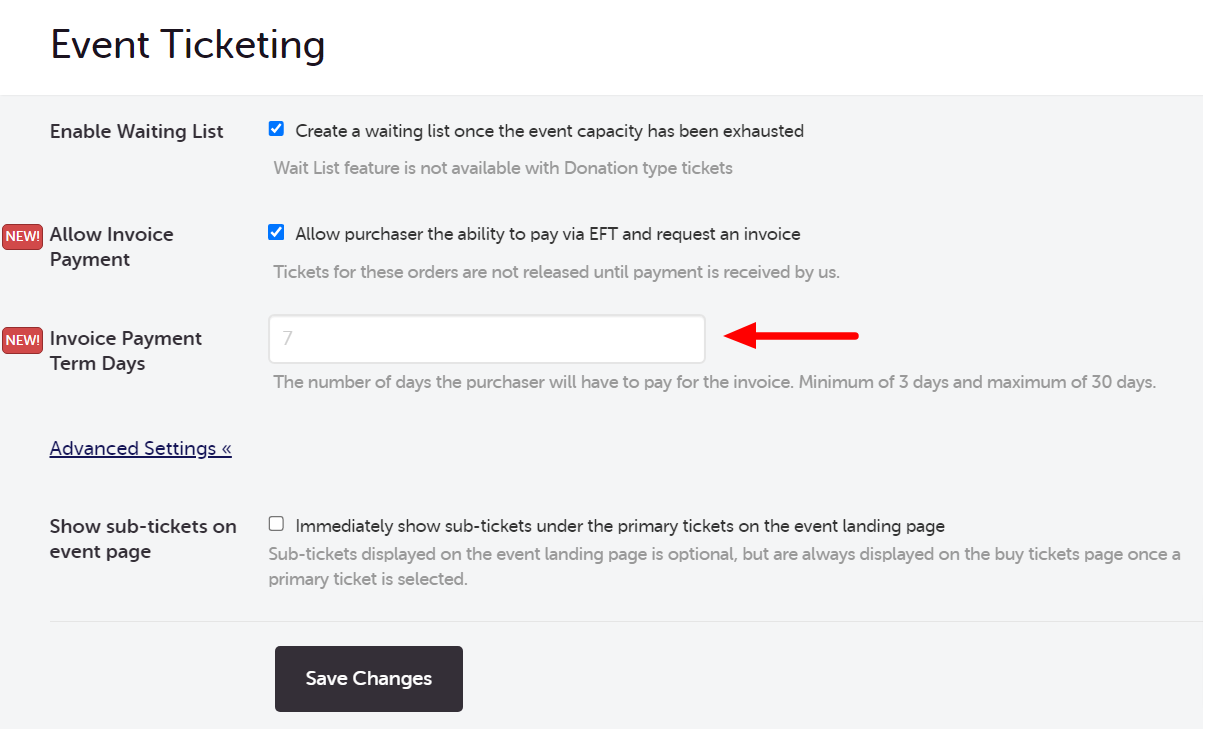
6. Enable Waiting List - If this box is checked, this will enable the Waiting List feature, the waiting list feature is triggered when a ticket type is sold out. For more information about this feature, please click here.
7. Allow Invoice Payment - If this box is checked, this will enable the Invoice Payment feature, It allows purchasers to request an invoice and pay for their order via EFT. Tickets for EFT payments are temporarily placed on hold pending payment, if payment is not received by Sticky Tickets by the due date these tickets will be released and be made available for others to purchase.
- The event organiser must set payment terms (the number of days that a purchaser has to complete the payment).
- Email reminders will be sent to the purchaser at 7, 3 and 2 day/s before the due date.
- An email will also be sent to the event organiser prior to the due date to inform them that an EFT payment is coming close to its due date that hasn't been paid yet.
- NOTE: It is not recommended to enable the Invoice Payment feature if the start date of the event is within two days or less or if the event has already started as there may not be enough time to process and confirm the payment. Apart from the Payment Term Days you set, the system also uses the START DATE of your event to determine when a booking that opted for an Invoice payment, expires
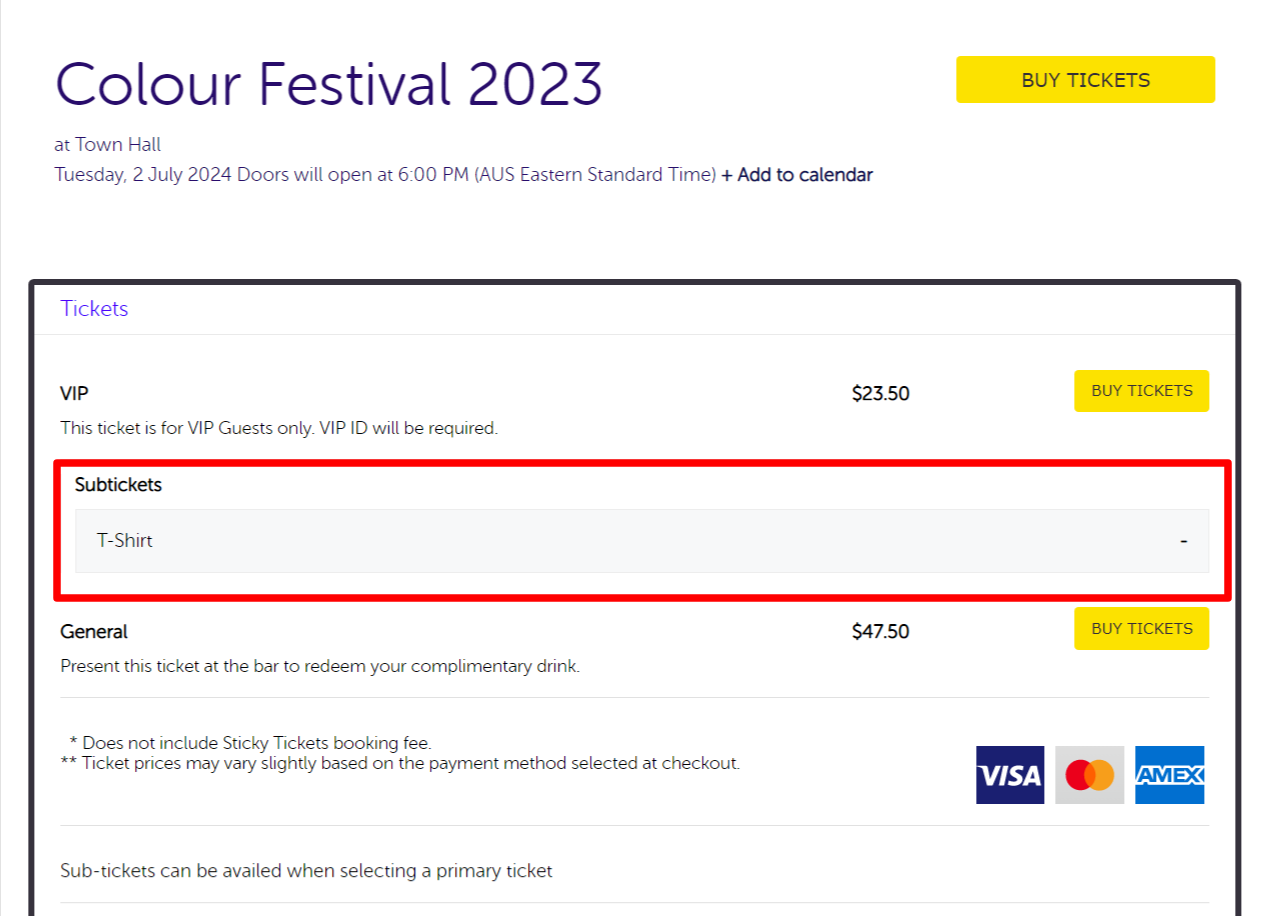
8. Show sub-tickets on event page - If this box is checked, the sub-tickets (if there are any) will appear on the Event Page (see the example below).
If you have any further questions about the Event Ticketing section, please don't hesitate to contact us at support any time and we'd be more than happy to help!
Related Articles
What’s the difference between event capacity, tickets available and ticket group capacity?
My event tickets are displayed as SOLD OUT
Live Chat
Chat with one of the team members online.
Stay Connected
Stay connected for regular tips, instructional videos, feature updates and industry news.
Sticky Tickets Australia Pty Ltd
Your online ticketing partner
Australian owned and operated
Ph: (02) 87 660 660 Mon-Fri (9am-7.30pm)
Email: support@stickytickets.com.au Mon-Sun (9am-9pm)
Mon-Fri (9am-9pm)
Sat-Sun (9am-5pm)
All times are Sydney Times - AEST / AEDT
ABN 25 122 052 206 | 119 Willoughby Rd, Crows Nest NSW 2065
Anyone can sell tickets to their event using Sticky Tickets!
Whether your event is big or small, corporate or charity, free or paid, you can list, promote, sell tickets and manage your event easily, all in one place.


